If you’ve bought or received an orchid, then now you need to learn how to take care of it, whether you’re going to cultivate it in your home, garden, or apartment.
That’s why you’ve come to the right place.
Over the past few years, I have specialized in orchid cultivation, studying with expert growers.
And today, I’m going to teach you what I’ve learned. This way, you’ll be able to:
- Make your orchids bloom
- Have resilient orchids
- Provide the care your orchid needs to stay healthy
Read on to learn how to care for your orchids, so they stay healthy and ready to bloom every year.
How to Care for Orchids in 7 Simple Steps

The biggest mistake a beginner orchid grower makes is thinking that caring for orchids is the same as caring for other plants, when it’s not.
It’s true, orchids are quite resilient, but there are some common mistakes that can kill them.
For example:
- Overwatering an orchid will cause its roots to rot and become sick.
- Providing too much sunlight will burn the leaves.
- Over-fertilizing will burn the roots.
But don’t worry, because if you master the 7 steps below, you’ll be able to care for your orchid like a pro.
1 – Where to Plant Your Orchids
Orchids can be found in nature in 3 different locations:
- Trees (most common)
- Ground
- Rocks
Each type of orchid should be planted in a specific location.
Now:
Your first step is to discover where your orchid lives in nature.
It might sound complicated, but we’ll help you with that.
Here on the blog, we have 3 articles that will help you identify whether your orchid lives on trees, in the ground, or on rocks.
- Article about epiphytic orchids (living on trees)
- Article about ground orchids (living in the ground)
- Article about lithophytes orchids (living on rocks)
Another option is to ask the seller if your orchid is epiphytic, terrestrial, or lithophytes.
After that, to decide where to plant your orchid, follow this tip:

Epiphytic orchids (which live hanging on trees) can be planted in pots, orchid wood basket, or hung in some location.
Terrestrial orchids (which live in the ground) can be planted in the ground with plenty of organic material or in pots.
Lithophytes orchids (which live on rocks) can be attached to rocks with organic material or placed in pots.
After this, there’s only one more step regarding planting. Understand the advantages and disadvantages of each location where you can plant your orchid.
Terra Cotta Pots
 Very common and usually good options for orchids.
The big advantage of these pots is that they have excellent drainage and are very durable.
They are also very easy to find in stores.
They are a good choice for most orchids, especially:
Plastic Pots
 They are the cheapest and most diverse, available in various colors and shapes.
They can also adapt to various orchids.
If the pot comes without holes, remember to make small holes so that water can drain during your orchid’s watering.
Like terracotta pots, plastic pots can be used for most orchids, for example:
- Phalaenopsis (we recommend transparent pots)
- Encyclia
- Paphiopedilum
Orchid Wood Basket

These pots are recommended only for epiphytic orchids.
They hang and provide more space for your orchid’s roots to develop.
The orchids that like this type of pot the most are:
When planting your orchid in any pot, remember:
The pot should be slightly tight for your orchid because wide pots can make your plant’s roots rot and consequently cause diseases in your orchid.
Attaching Orchids to Trees

Recommended only for epiphytic orchids, when attaching your orchid to a tree, its cultivation becomes much simpler than it would be in a pot.
Here is the step-by-step guide to attaching your orchid to trees:
- Choose a location that provides the ideal growing conditions for your orchid
- Select a rough-barked tree that does not peel its bark
- Use plastic to attach your orchid to the tree, making sure the roots are not suffocated
- Now, just wait for the next bloom
The use of sphagnum moss can help in attaching your orchid to trees.
Often, there is no need to do anything else after attaching your orchid.
2 – Know the Best Orchid Soil
Now let’s talk about how to choose the best soil for orchids.
Basically:
The soil is responsible for supplying the nutrients that your orchid cannot naturally obtain.

For example, if your orchid cannot retain water, your soil should have good water retention.
They are mainly used in potted orchid cultivation.
Being essential for anchoring the plant.
In the past, this was a very simple topic because you only needed to use tree fern fiber (xaxim), as it provided almost everything orchids needed. But today it is threatened with extinction in some countries, which is why, depending on its location, the sale of this substrate is prohibited.
That’s why, after many studies, it was concluded that the ideal is to create a mix of soil, that is, select some materials and mix them.
Here are some of the best soil you can use for your orchid:
- Fir Bark (light, good drainage, a little rarer and more expensive)
- Sphagnum Moss (retains good humidity, helps with fixation on trees. Ideal for orchids that like humidity)
- Coco coir husk chips (offers good aeration for the roots, has good durability as a substrate and retains moisture – It is a substrate that divides the opinion of growers, some like it, others don’t.)
- Charcoal (excellent drainage)
- Pine bark (retains moisture, retains nutrients)
- Perlite (improves drainage and aeration of orchids)
- Tree Fern Fiber (considered by many growers as the best substrate for orchids. If this substrate is not prohibited in your location, it is a great option)
Remember that there is no rule for which ones to use; select those available in your region that provide what your orchid needs.
Recommended readings:
- https://orchidresourcecenter.com/pine-bark-vs-fir-bark-for-orchids/
- https://www.perlite.org/growing-orchids-in-perlite/
- https://www.slippertalk.com/threads/coconut-husk-chips-good-or-evil.28491/
3 – The Ideal Climate for Orchids

The climate in your region greatly affects your cultivation; the following four factors are the most important:
- Humidity
- Ventilation
- Temperature
- Light
Ideally, when buying your orchid, you should choose one that adapts to your region.
Here are some tips that will help you take care of your orchid.
Humidity and Ventilation
The ideal humidity varies from orchid to orchid.
To determine if your orchid needs higher humidity, check if it meets any of the following criteria:
- Fine roots
- Thin leaves
- No pseudobulbs

Orchids with pseudobulbs and thicker leaves will need lower humidity.
A good rule of thumb is to try to maintain humidity between 60% to 80%.
On some days, humidity may be higher or lower than this average, but if it’s not for several consecutive days, there’s no need to worry.
As for ventilation, it’s straightforward.
Your orchid needs an environment without strong winds but with good ventilation. Don’t place it in completely closed spaces.
Light and Temperature
Lighting is the most important factor for making your orchid bloom, so pay attention.
Most orchids do not like direct sunlight, so you can:
- Use shade cloths (check which one is ideal for your orchid)
- Place your orchid in a shadier location
- Attach your orchid to a tree that provides shade
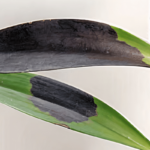
If the problem persists, follow the instructions in the article on orchid leaf spots.
- If the leaf is darker green than normal, it lacks light. This happens because the plant needs to increase chlorophyll production to capture more light.
- If the leaf is more yellow or black, it is receiving too much light. In this case, the plant has reduced chlorophyll production or is sunburned.
Regarding temperature, this is a slightly more complicated factor because, unless you have a greenhouse, it is difficult to control.
Therefore, it is ideal to choose to cultivate an orchid that is already adapted to your climate.
See what temperature can do to your orchids:
- High temperature: It can dehydrate, burn the leaves and flowers, or even kill the orchid.
- Low temperature: It can induce dormancy (no flowering for 1 or more years) or weaken the plant, making it susceptible to diseases.
4 – How to Water Your Orchid
Watering is the factor that kills most orchids. Many beginners make mistakes in this regard, either drowning their orchids or letting them die of thirst, whether they bought or received them.
So, you need to know when and how much to water your plant.
To find this out, you have three options:
- Use a scale: If you have a scale at home, weigh your dry orchid and write down its weight. Then, water it, and when your orchid returns to the recorded weight, it’s time to water again.
- Use your finger: Stick your finger into the middle of the soil and check if it’s wet. If it’s still moist, wait another day and check again; when it’s nearly dry, water it.
- Use a pencil: Sharpen a pencil and insert it into the soil; if the bark changes color, it’s time to water.
When watering, use lukewarm water and only water the roots.
If possible, water in the morning. By watering early, your orchid won’t stay wet overnight, preventing root rot.
Some tips:
- Avoid watering orchids with ice
- Do not wet the leaves
- Many people say orchids don’t like water, but that’s not true. You just need to water them at the right time.
5 – How to Fertilize Orchids
Finally, we have reached the most interesting topic.
In this part, I’ll try to answer your main questions on the subject:
- Is there a fertilizer that stimulates orchid flowering?
- What is the best fertilizer?
- Should I fertilize the roots or the leaves?
But first, you need to understand that there are two types of fertilizers: chemical (inorganic) and organic.
Chemical or inorganic fertilizers are manufactured in factories, offering greater nutrient concentration and control. However, excess can harm your orchid due to rapid absorption.
The most common type is NPK.

Organic fertilizers, as the name suggests, are made from organic materials.
They do not offer as much nutrient control as chemical fertilizers, but are ideal for beginners because excess is not harmful to your orchid due to slower absorption.
The most common types are seaweed extract, fish emulsion, compost tea, worm castings, etc.

Fertilization must be done following the instructions on the fertilizer packaging.
Recommended readings:
- https://hurtledto60.com/fertilizer-for-orchids/
- https://www.themarthablog.com/2017/01/feeding-my-plants-compost-tea.html
- https://staugorchidsociety.org/PDF/OrchidSupplementOrSnakeOilBySueBottom.pdf
- https://orchideria.com/fish-emulsion-for-orchids/
6 – Understand Your Orchid’s Cycles
To care for orchids like a pro, you need to understand the cycles they go through.
One of the most common mistakes beginners make is thinking that if the flowers fall off, the orchid is dying.
And that’s not true.
Flowers falling off is perfectly natural and will happen.
Basically, most orchids go through 3 distinct cycles throughout the year.
- Growth: This is where new leaves, roots, stems, etc., will appear. During this time, your orchid will need more water and nutrients because it’s expending more energy. Repotting should be done during this period.
- Flowering: This is when the flowers appear until they fall off. Its duration varies from a few days to 3 months depending on the species. Be careful not to get fertilizer on the flowers as it can stain them.
- Dormancy: The orchid stops growing and developing. Many people think it has died, but it’s just “sleeping” to regain its energy. This period can last for weeks or months. Here, watering and fertilizing should occur less frequently as your orchid is expending less energy.
You need to be able to differentiate between these 3 periods.
Because in each period, your orchid has slightly different needs.
Recommended reading: See when you should or shouldn’t cut the flower spike of your orchid after flowering.
7 – Prevent Pests and Diseases
Did you know that it’s possible to prevent your orchid from getting sick?
It’s not 100% effective, but by following the tips below, you’ll be able to prevent the vast majority of pests and diseases that can attack your orchid.
- Follow the tips in this article and provide good care for your orchids.
- When buying a new orchid, keep it separate from the others for 40 days.
- Always sterilize the scissors you use to cut your orchids.
- Use cinnamon powder to improve wound healing.
- Never let a pot with water sit under your orchids.
- Keep your orchids at least 40cm apart from each other.
- Check your orchid every day for any unusual signs.
- Keep your orchid growing area clean at all times.
These are simple tips, but when applied, they can prevent many of the problems your plant might encounter.

Recommended reading: Mealybugs on Orchids – Identification and Control
Differences in Apartment Orchid Care
To care for orchids in an apartment, the care you’ve learned above is essential.
The major difference is that there are some additional considerations that are necessary.
You need to understand:
- How the height of your apartment will influence your cultivation.
- How to choose the location for your orchid in the apartment.
- What to do to avoid excess light.
- What care should be taken in fertilizing when growing orchids in apartments.
- How to combat pests and diseases in enclosed spaces.
By mastering the 7 steps we’ve already covered and understanding these 5 special care considerations for growing orchids in apartments, you’ll be able to achieve beautiful blooms in your garden, home, or apartment.

1 – Apartment Height
The higher your apartment is, the more complicated it becomes to cultivate orchids.
In taller apartments, these phenomena start to occur:
- Lower humidity
- Higher lighting
- Stronger ventilation
To increase humidity, there are some tips that can be helpful.
- Place a wet towel near your orchid.
- Buy a humidifier.
- Place a pot with water and gravel next to your orchid (never underneath the orchid).
In the case of lighting, shading screens will be very useful.
And regarding ventilation, this can be corrected by placing your orchid in an appropriate location.
2 – Where to Place Your Orchids in the Apartment
There are species that like more light, such as the dendrobium phalaenopsis, while others prefer less light, such as miltonias.
So, do a little planning where:
Your orchids or other plants that prefer more light are placed near windows, while those orchids that prefer more shade are placed behind them.
This way, you create a “natural lighting barrier” where all the plants benefit.
3 – How to Avoid Excessive Light
To do this, you can use shading screens, which are commonly used in orchid nurseries to filter sunlight on their plants.
Many times, these screens are necessary for you to grow your orchid well, but unfortunately, they are prohibited in some apartments.
If your apartment allows these screens, know that:
The majority of orchids like shading between 50% to 60%.
However, do some research on your species before using them.
4 – Differences in Orchid Fertilization in Apartments
This is a topic you need to be a little careful about because apartments are enclosed spaces. So if the fertilizer has a strong smell, it will spread throughout the room.
My advice in this case is very simple, use chemical fertilizers.
They are easier to apply and don’t smell bad.
Organic fertilizers need to decompose for your orchid to absorb the nutrients, and during this decomposition, they release unpleasant odors.
5 – What to Do About Pests and Diseases
There are many pests that can affect your orchids in apartments, and many of them are windborne.
Some common ones are mealybugs and aphids.
To prevent them, you can use natural protectors for orchids, such as neem oil.
You can also manually remove pests from your orchid (but it’s very labor-intensive).
As for fungicides and other chemical combat products, I recommend that you avoid using them as much as possible because you are in an enclosed environment, and they can be toxic.
Fascinating Facts About Orchids

Before learning how to cultivate orchids, you need to understand a bit more about them.
Orchids belong to the Orchidaceae family, which has about 30,000 different species discovered (not counting the thousands of hybrids created by humans).
The characteristics of orchids can be highly varied.
- Some are small, like mini orchids.
- While others can exceed 4 meters in size.
In addition to all this diversity and the number of species, orchids are found on every continent except Antarctica.
Thanks to this adaptation, they ended up being found in the most diverse locations, such as:
- Swamps
- Deserts
- Forests
- Mountains
- Among many other places
That’s why it’s very important that you identify the species of your orchid.
This way, you’ll know what the natural habitat climate is like for your plant.
Getting to Know the Main Orchid Genera
There are orchids of various sizes and shapes, some are quite curious, like the ballerina orchid.

Others have received attention due to the beauty of their flowers or their ease of cultivation.
And that’s what we’re going to talk about now.
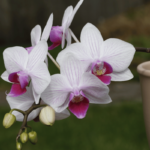
Phalaenopsis – The Moth Orchid
Probably the most famous type of orchid, Phalaenopsis is easily found in markets and orchid nurseries.
They gained great prominence among growers because they have beautiful blooms that can last up to 3 months, in addition to having relatively simple cultivation requirements.


If you’re just starting to care for orchids, Phalaenopsis is undoubtedly one of the best choices.
Its main species include:
- Phalaenopsis Amabilis
- Phalaenopsis Violacea
- Phalaenopsis Aphrodite
- Phalaenopsis Schilleriana
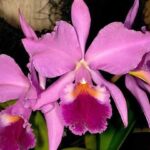
Cattleya
This is a very famous genus in the Americas, with several Brazilian species.
Cattleyas are also orchids with extremely simple cultivation requirements and magnificent flowers.

Some species are so admired by orchid enthusiasts that they have exclusive exhibitions, such as Cattleya Walkeriana.

These are orchids that will adapt very well to most of the Brazilian climate, and they are easy to find and, most of the time, at an affordable price.
Its main species include:
- Cattleya Aurantiaca
- Cattleya Bicolor
- Cattleya Labiata
- Cattleya Chocoensis
- Cattleya Nobilior
- Cattleya Purpurata
- Cattleya Elongata
- Cattleya Intermedia
- Cattleya Walkeriana
Cymbidium – The Boat Orchid
This is a genus native to Asian countries, but it is now cultivated in many parts of the world, thanks to its beauty.
Discovered in 1799, it is currently estimated that there are over 11,000 hybrid species of Cymbidium.


They are mostly epiphytic, but in some cases, they can also be terrestrial. When it comes to cultivation, they prefer cooler environments with good lighting and moderate humidity.
Its main species include:
- Cymbidium aloifolium
- Cymbidium floribundum
- Cymbidium devonianum
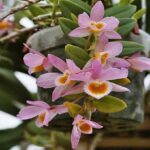
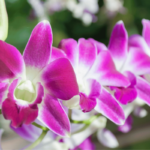
Dendrobium
Currently, with 1510 species and numerous hybrids, Dendrobium orchids attract the attention of any grower due to the beauty and diversity of their flowers.


You can find species that produce only a few flowers per year, while in other species, hundreds of flowers appear with each flowering.
These are epiphytic orchids that mostly prefer slightly warmer climates.
Its main species include:
- Dendrobium kingianum
- Dendrobium nobile
- Dendrobium anosmum
- Dendrobium aggregatum
- Dendrobium moniliforme
- Dendrobium victoriae-reginae
- Dendrobium densiflorum
Vanda
Vandas have a very interesting characteristic; they like to be cultivated without soil and preferably hung in some place, whether it’s a orchid wood basket or attached to trees.
These are orchids that can grow up to 2 meters in height.


When it comes to cultivation, you should water them when the roots turn gray, avoid very cold climates, fertilize them on average every 7 days, and preferably let them hang in some place.
Its main species include:
- Vanda coerulea
- Vanda cristata
- Vanda denisoniana
- Vanda lamellata
- Vanda tricolor
- Vanda teres
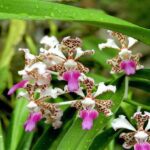
Oncidium – The Dancing-lady Orchid
Famous for its yellow flowers, orchids of the genus Oncidium are found in the American continent, with 330 species today.


They are epiphytic orchids that quite like indirect sunlight, with about 50% lighting being ideal. In addition, avoid exposing them to very low temperatures.
Its most famous species include:
- Oncidium crispum
- Oncidium altissimum
- Oncidium aloha iwanaga
- Oncidium twinkle
- Oncidium sharry baby
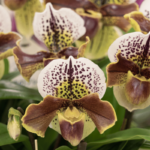
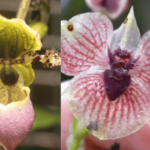
Paphiopedilum – The Venus Slipper Orchid
Paphiopedilum is a genus of terrestrial orchids highly admired by orchid enthusiasts.
They can be planted in soil, they like a lot of water, and they don’t need much fertilization.
The nickname “slipper” comes from the shape of their flowers.


Its most famous species include:
- Paphiopedilum rothschildianum
- Paphiopedilum insigne
- Paphiopedilum leeanum
- Paphiopedilum delenatii
Conclusion
I hope that with these tips, you have learned how to take care of your orchids.
It doesn’t matter if they were received as gifts, purchased at the market, or from an orchid nursery.
If you liked everything you learned here, share this article on your social networks by clicking on the icons below.